HOME | JAVA | HTML & CSS | JAVASCRIPT | PHP | MYSQL
|
HOME | JAVA | HTML & CSS | JAVASCRIPT | PHP | MYSQL |

JavaScriptAn Introduction on How to Alter HTML from User Input | ||
Programmers Note: JavaScript IS NOT JavaLike PHP, JavaScript can generate content on the web. And like PHP and Java, JavaScript has variables, functions, loops, arrays, etc. BUT Don't confuse JavaScript with Java. Even though the name sounds similar, they are not the same programming language. For one, Java is a compiled language, whereas JavaScript is an interpreted language. That is, you don't have to compile it before you use it. You can just save your HTML page and view it in a browser. Of course, there are problems with this too: mainly debugging. When you look at your web page, the only thing that tells you that there is an error in your code is that the site doesn't work the way you want it to! With Java compilers, the compiler tells you where your errors are and what they are. So, you can imagine that debugging JavaScript can become a real pain! IMPORTANT NOTE: Now then...What is JavaScript? It's a programming language that gets embedded into the header of your HTML web pages. It can enhance the dynamics and interactive features of your page by allowing you to perform calculations, check forms, add special effects, customize graphics selections and more. One thing that's especially nifty about JavaScript is that it allows you to change things on your webpage in real time. That is, you don't have to reload the page to see the changes take effect. Things can happen right when you click a button or type a value or submit a form. Those who know PHP know that you have to reload the page if you want to see something change - like submitting a form, for example. In this tutorial, we will cover the basics of structure and syntax and then go through a few relatively easy JavaScript samples, like creating a mouse rollover effect or a calculator. This is intended as an introduction to JavaScript, so we will not delve too deep. Part 1: The Structure [back to top]The first step to understanding how everything works is to visualize a tree structure. Those familiar with programming in general will understand this immediately, but for those who don't, take a look at this diagram: 
Called a tree diagram, this consists of several Nodes (each little square) that are connected to each other. The way they are connected is called a relationship. This particular tree diagram breaks down the world into cities. The important thing to note how to describe the tree and how to describe the relationships. In this example, we say that "world has 6 children" and "North America" has 1 child, which has two children. You can also describe this tree by saying "the world has 6 regions and each region has a certain number of countries and each country has a certain number of cities" Given a particular node, you can access its children and its parent. You can also access its childrens' children and it's grandparent, etc. This means that any one particular node can access another through a series of movements (called traversal) through the tree. For example, how do we get from New Zealand to France? Go to Asia Pacific, go to World, go to Europe, go to France. You should get the idea. Anyway, this is how your webpage is structured, except we're not talking about the world and countries. We're talking about tags. You know that some tags are inside of others in an HTML webpage. In terms of a tree diagram, those tags would be considered "children" of the first tag. Take a look at this sample code: 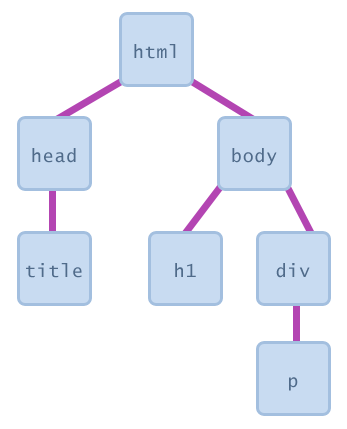
<html>
<head> <title>My Page</title> </head> <body> <h1>My Header</h1> <div><p>Some text</p></div> </body> </html> Now take a look at the image of this hierarchy: The "head" tag and the "body" tag are children of the "html" tag. The "title" tag is a child of the "head" tag. The "h1" tag and the "div" tag are both children of the "body" tag, which makes them siblings There's one more "node" above "HTML" -- in Javascript, it's called document and it's the container for all HTML HEAD and BODY objects associated within the HTML page. Where are we?
Now let's talk about node attributes. Suppose we have a node that is an image tag. That is: <img src="myPicture.jpg" name="mypic" /> All the tags in your HTML page have attributes like this. A form, for example, can have a name, a method, an action, etc. Tables can have cellspacing, cellpadding, border, etc. So given the following code...
<body bgColor="red">
<img src="myPic.jpg" name="myPic" width="300"> <form name="myForm"> <input type="text" name="email"> </form> </body> ...you could imagine creating a heirarchy picture like the one below. The items in bold are the objects, and the items inside the boxes are properties of the objects. 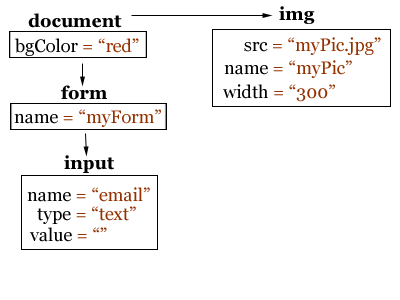
Now, we see how everything is connected. How do we access each of these properties? We start at the top, with "document" (which is the generic name of your webpage object) and add a period - "." - as we traverse the tree down to the node we want. So if you wanted to change the background color of your webpage, you would write:
document.bgcolor = "red"
If you wanted to access the value of the input, you would write:
document.myForm.email.value
Note that you can access the other objects on the page through the name you give them. This is precisely a good reason to name your objects when you code HTML if you plan to include JavaScript! Let's delve a little deeper and talk about images. You know about the HTML image tag:
<img src="happy.jpg" name="myImage" width="200">
Looking at this, we see that this image has a few defined properties: the source, the name and the width. Any idea how we would access these? If you wanted to change the image source, you would write:
document.myImage.src="sad.jpg"
Start Playing Around Open a text editor and create some basic HTML with all the necessary tags. Make sure your page has an image and let's name the image "myImage". Make sure the image has a source file! Save this page with the extension .html. Then open it up in a browser and ensure your image is displaying properly. Now add this right after the image tag in your HTML:
<script type="text/javascript">
</script> What are we going to do? We're going to add a quick piece of Javascript code that will change the source of the image you have on your page. So this is what we type within the script tag:
document.myImage.src="anotherpicture.jpg";
...obviously replacing "anotherpicture.jpg" with another image you have on your computer. Save this and view the page in the browser and Look! The image you hard-coded into your HTML isn't there! Instead, it's the new image. So there's a quick example of how to get to a specific node and alter an attribute. If you give a tag a unique ID -- i.e. <img src="myPic.jpg" id="thisimage"/> then Javascript can access it through:
document.getElementById('thisimage');
If you saved this to a variable, then you could start altering attributes...so let's talk about that now. Part 2: The Syntax [back to top]Java Syntax vs. JavaScript SyntaxSince you're familiar with Java -- and perhaps even PHP -- JavaScript syntax is somewhat simple to learn. One thing similar to PHP and unlike Java is that you don't need to specify variable types. In Java, when you declare variables, you need to specify their type (i.e. int, double, String, boolean) but in JavaScript, all you have to do is set up the variable name and specify that it's a variable. Then set it to whatever you want! Suppose we want to create a number variable called "count" in Java that holds the value 3.
private int count = 3;
...but in JavaScript, all we write is:
var count = 3
Let's introduce the concept of variables. What is a variable? A variable holds some kind of value (a number, a true/false value, a series of characters or letters, an object (like a node...) etc.) and is able to change. In JavaScript, you don't have to specify what the type of the variable is when you create it. All you have to do is specify that it is a variable and then give it a name. Look at this:
var count = 3
What this does is create a new variable called "count" and gives it the value of 3. So now, if you write "count" then it is really just another way of writing 3. Variables are useful because we can take a piece of information, store it, and use it later in other forms. If you've ever used a graphing calculator, you might be familiar with the "store" command in which you can take a number and store it as X, for example. That way you can use it in another calculation easily (especially if it's a long number and you don't want to write it down somewhere). Now, remember how we get the value of an HTML input field? That value will be something that you, the user, types. We can take that value and assign it to a variable!
var myText = document.myForm.name.value
...and now that we have this value stored in a variable, we can do something with it. What to do? That comes next. A bit about formatting though: Part 3: Functions [back to top]Let's talk about functions. Functions change the variables. There are "command" functions, mostly used for situations where you want to change something. For example, if you have a variable to keep track of the count of something, then maybe you want a function that just increments it. Or maybe you want a function that changes the source of one of your pictures! There are also "query" functions, which means they can change an instance variable or some other variable AND they give you something back, which means they "return" a new variable value. So you could create a function to multiply two numbers and from that function, you want to know what product is. Well, that's a value that the function can return to you. Java Syntax vs. JavaScript SyntaxIn JavaScript, methods are called "functions" and there is no need to specify the return type (void, int, etc.). In Java if you wanted to write a function to multiply two numbers you might write:
public int multiply(int i, int j) { return i*j; }
But in JavaScript, you would write:
function multiply(i,j) { document.write(i*j) }
The "document.write()" is just one way to output the results. We'll talk more about that later. Functions also take what is called "parameters" or "arguments." These are specified variables that are needed to do whatever calculation is in the function. For example, if you wanted to write a function to multiply two numbers, you would have to specify which two numbers you want to multiply! Here is the syntax for the beginning of that function:
function multiply(i,j) { }
Note we first specify that we're writing a function. Then we give the function a name. Then, in parenthesis, we put "dummy" variable names to represent the actual values we are going to put in. Think of these as placeholders. It just says we're going to be putting in two values and we're going to be referring to the first number as "i" and the second number as "j." What goes between the curly brackets { } is the actual function calculation that will calculate the product of i and j. Part 4: Events [back to top]So now that you know about variables, syntax and how to create functions, let's talk about how we can call on these functions within the HTML code. You might think you would just create a button on the page and attach it to a specific function when you click it -- and that's true -- but there are a lot of other ways to call functions! Let's take a look.
So, with that said, we can go ahead and create some simple examples. Part 5: Simple Examples [back to top]Changing the Page Background ColorNow that you know a bit about variables, the webpage hierarchy and functions, let's do something nifty. Create a new HTML webpage with a form -- call it "myForm" and an input of type "button" with a value of "BLUE." Your webpage HTML should look like this:
<html>
<head> </head> <body> <form name="myForm"> <input type="button" value="BLUE"> </form> </body> </html> If you look at this page in a browser, you should see a simple button called "BLUE." To write Javascript, you have to create a new HTML tag in the HEAD of your page. This is a "script" tag and we write it like this:
<script language="javascript">
</script> Everything Javascript-y that you write will go here between the open and closing tags. We want to write a function that will take a color (really, a String of characters) as a parameter and change the page's background color to that value. So, in the script tags, we write a new function, call it "changeColor" and then in the parenthesis, put some dummy variable and call it 'color' for example. Then, in the curly brackets { } all we're doing is setting the page's background color to 'color.' Look:
<script language="javascript">
function changeColor(color) { document.bgColor=color } </script> ...and now that we have defined this function, we need to add a way for the users of this webpage to call this function and change the color! We add a new property to out "input" object on our page:
<input type="button" value="RED" onClick="changeColor('blue')">
We've added "onClick" as a property and set it equal to this JavaScript function we made. Note that we've put "red" in single quotes. If we didn't, then the script would that "red" is a variable name, when in fact it's a string of letters. We want it to read that way. Here is the completed script. Click this button and the page background will change to blue. Click the "reset" button to change it back to white. If you wrote what we've written above on your own page, you can save your page and view it in a browser. Click the "BLUE" button and your page background changes to red!! (If this doesn't happen, make sure you have JavaScript enabled in your browser). Similarly, you can create other buttons that change the background to other colors. All you have to make sure you do is change the parameter of the function to the right color. onClick="changeColor('blue')" would change the color to blue. Mouse Rollover EffectsLet's do a simple mouse rollover effect. First, create an image of your choice. Here we will use the faded and non-faded buttons on the homepage of this site to view this JavaScript tutorial:
What we want is the faded image to display, and when your mouse moves over it, it changes into the non-faded version. Any ideas? We know how to get the image's source - we just need to create a function to change it to a different picture onmouseover and then change it back onmouseout. Let's create a function called "changeImage(m)." Here, "m" will be the new image source we want to change your image to. Your code should look like this:
<script language="javascript">
function changeImage(m) { document.myImage.src=m } </script> ...where "myImage" is the name of your image. Now, in our HTML, let's create our image -- the faded one -- and give it a name and define the onmouseover and onmouseout events. Here's the code for this JavaScript image:
<img src="javascript_intro_f.gif" name="myImage" onmouseover="changeImage('javascript_intro.gif')" onmouseout="changeImage('javascript_intro_f.gif')" />
 Save your page and view it in a browser and BAM. It works! Mouse over the image to the right. There's a way to do this without creating a JavaScript function as well. Instead of calling a function onmouseover or onmouseout, you can just explicitly set the source to a new image like so:
<img src="javascript_intro_f.gif" name="myImage" onmouseover="src='javascript_intro.gif'" onmouseout="src='javascript_intro_f.gif'" />
Showing / Hiding TextSuppose you want some text on your page to appear when you click a button and disappear when you click another? You may know from CSS that one of the properties is "display" which can be set to none, or something visible. Showing and hiding text is merely setting this value from "none" to "block." Here's what we do. Let's create a button on our page and a div:
<form name="myform">
<input type="button" name="mybutton" value="Show" /> <div style="display:none;" id="shown">Some Text Goes Here</div> </form> It's important to give this division an id so we can access it easily through document.getElementById as described above. Note that we're starting off by having the div NOT DISPLAY. Now for the actual JavaScript code. In your "script" tag, make a new function called "toggleLayer" that takes a parameter -- call it "theid" This code will find the element with the id specified and set its CSS display style to either "none" or "" depending on what its current value is. Let's also alter our button's value from "show" to "hide" and vice versa, depending. Here is the full function:
function toggleLayer(theid) {
var temp = document.getElementById(theid); if(temp.style.display!="") { temp.style.display=""; document.myform.mybutton.value="Hide"; } else { temp.style.display="none"; document.myform.mybutton.value="Show"; } } This sets the div element to a temporarily variable. Then we check the display style of the division. If it doesn't equal nothing, then set it to nothing and change our button to say "hide" (because we're showing it). Otherwise, set the display to "none" and change our button to say "show". So now, on your page, we can add functionality to the button by using the "onclick" event:
<input type="button" value="Show" name="mybutton" onclick="toggleLayer('shown')"/>
...and here is what it all looks like: Part 6: Built-In JavaScript Functions [back to top]JavaScript has a lot of built-in functions that are really nifty and useful. Some are Math-specific and others can do special things with Strings (series of characters like "Hello World!") and Arrays (series of things like numbers or Strings or other arrays, etc.). MathFirst, JavaScript has a lot of built-in Math values. You can get standard math values like PI, or e or logs, etc. by writing Math.E or Math.PI or Math.LN2 etc. You can search online for all sorts of built-in Math values in JavaScript. Second, JavaScript has built-in Math functions. Some of these include min() and max(). These functions take two numbers as input and return the min or max of the two, respectively. So, for example, if you had:
var s = max(4,7)
...s would be equal to 7, since 7 is the max of those two numbers. Same goes for the "min" except then s would equal 4. You can also round numbers via the Math.round() function which rounds a number to the nearest integer (so 4.7 would be 5 and 4.4 would be 4). You can explicitly round down or up via the Math.floor() or Math.ceil() functions. You can generate random numbers via the Math.random() function, which takes no parameters and generates a random decimal between 0 and 1. So, if you wanted to create a random number between 0 and 10, say, you would write Math.floor(Math.random()*11)) StringsThe String object is used to manipulate a piece of text. Suppose you have a String of text:
var myText = "Hello World!"
You can get the length of this string by writing myText.length (and here, that value is 12). You can also convert everything to uppercase by writing myText.toUpperCase() which will make it "HELLO WORLD!" You can also alter styles with methods like bold(), italics(), small(), big(), strike(). And, there are style methods which take parameters like fontcolor("Red"), which would change the font color to red. These are just a few built-in functions, but you can find a list of all sorts of built-in functions online. There's also a function called eval() which takes a String as parameter and evaluates the expression. This is useful if you have a String that's like a math equation like "3 + 4 / 2." If you used the eval() method on this String, you would get 5.; A Simple and Practical Example!You know enough stuff by now to create ... a calculator! First let's setup our HTML code for how this will be layed out. It will consist of a form (call it "calc"), an input of type text at the top (call it "total"), followed by a series of buttons 0-9 and +, -, /, * and =. If you're lazy, you can just view the source code for this page, scroll down and copy this, or you could work to create your own. Basically, each of the buttons alters the input's value by adding a number or operator to it. So take button 9 for example:
<input type="button" value="9" onClick="document.calc.total += '9'">
Writing "this += that" is the same as writing "this = this + that" by the way. But anyway, so what we do whenever we click a button is we are adding another value to our input String (Hence why 9 is in single quotes). Then when we click the "=" button, we use Java's built-in eval() function to evaluate the String and show the result in the input field! That's all for now. If I decide to write more, then I will. Go learn from tutorials now! |
| Home |
Java and Programming | HTML and CSS | JavaScript | PHP | MySQL Copyright © 2006 Eric Fisher | eFishDesign.com |